Getting started with "Cum 4 All"
This example shows you how to use the shape objects from the package "Cum 4 All". Click on the images to view them in original size in a new TAB.Even though there are a lot of words here - don't worry! Using "Cum 4 All" is not as complicated as it looks at first glance.
1. Load an Iray Light Setup Scene
Without an Iray lighting the rendered image may not look as expected. The package contains 2 light setup scenes (expand the "Xtras" folder). I suggest using the "Simple Dunes" scene because this scene makes it easy to change the lighting later.2. Load your model and a "Cum 4 All" shape
Load your favorite model. To keep things simple, do not apply a pose. Just use the basic pose that the model is loaded with. Now load one of the "Cum 4 All" shape objects. I suggest using the "A" or "B" shape for your first experiences.Keep in mind: After simulation, the shape object is attached to the pose of the model. That is, you cannot change the pose of the model, because this will destroy the shape.
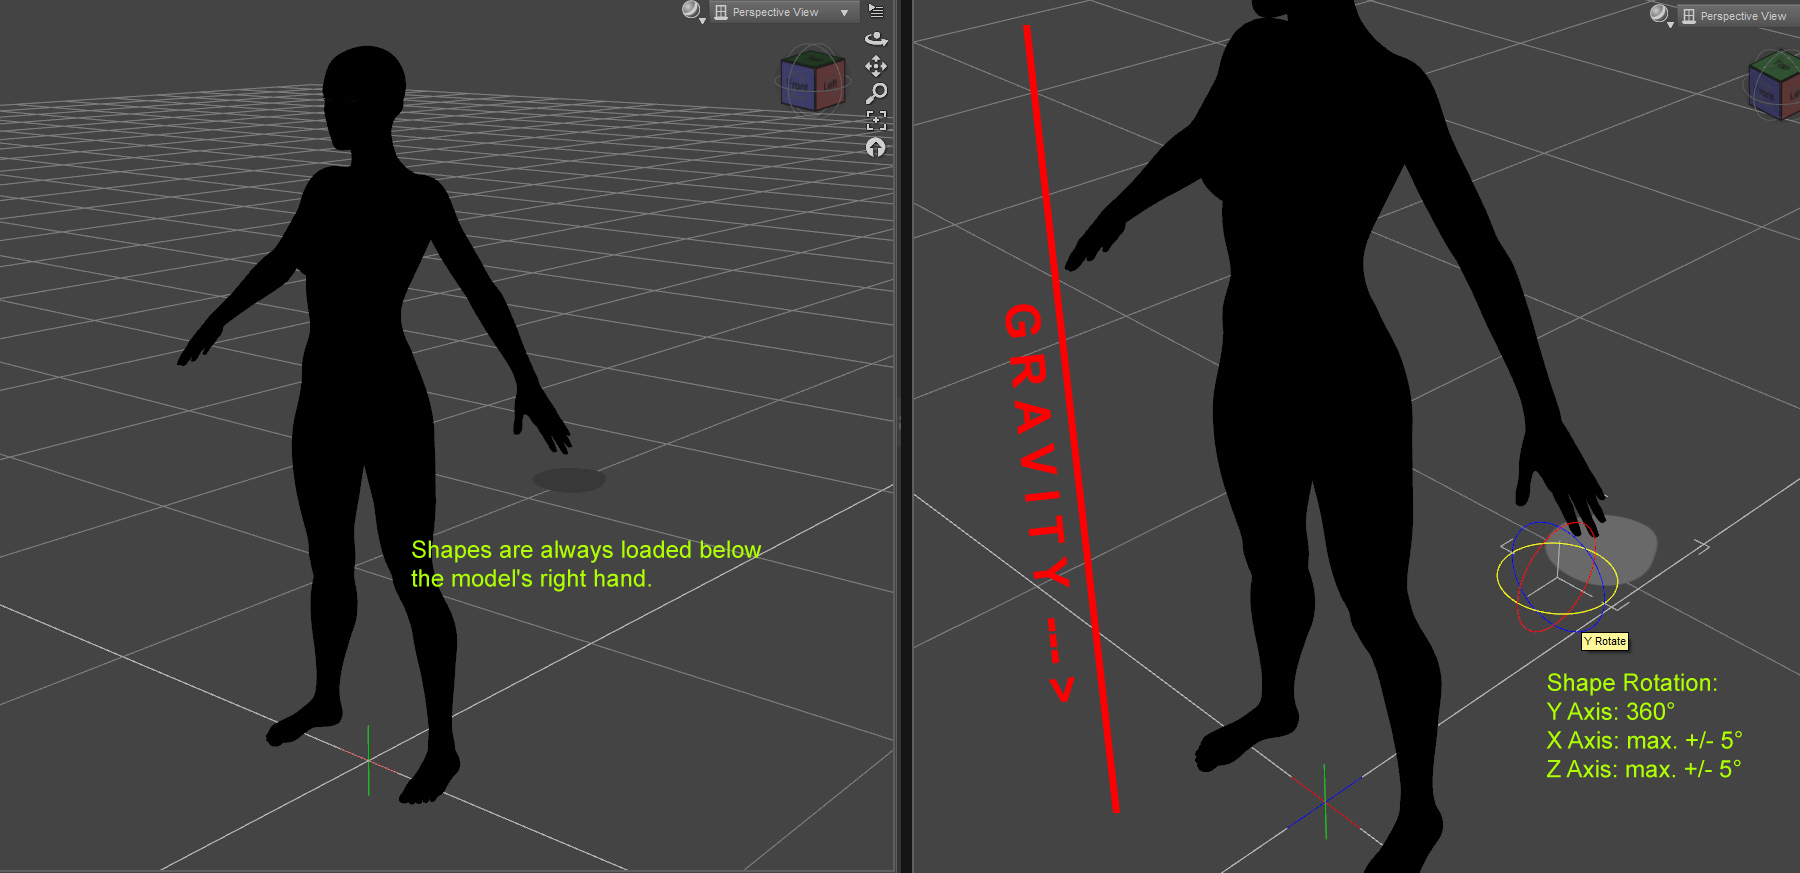
Shape objects are always loaded below the model's right hand. The start color is a pure white without transparency or glossyness. When rendered it looks like something you may use to paint your walls - but for positioning the shape it is the best (and most viewable) material setting.
One thing you should always keep in mind when working with "Cum 4 All" shape objects: Respect the Gravity!
Although you can rotate the shapes 360° around the Y axis, you should not rotate them around the X or Z axis. This will lead to nothing - or at least to unexpected results - after the simulation, because in this case you are working against gravity.
This means: instead of rotating the shape (with exception of the Y axis) you have to rotate the model. If you are using your model in a lying pose, rotation may not be necessary. But it is always important: pay attention to gravity. You get the best results when the target surface is parallel to the shape object and the shape object is parallel to the ground.
In this example, the selected shape object is to be placed on the model's belly. Let's go!

Shapes are always loaded below the model's right hand. Respect the gravity! Don't rotate the shape more than +/- 5° on X- and Z-Axis.
3. "Posing" the model and positioning the shape object
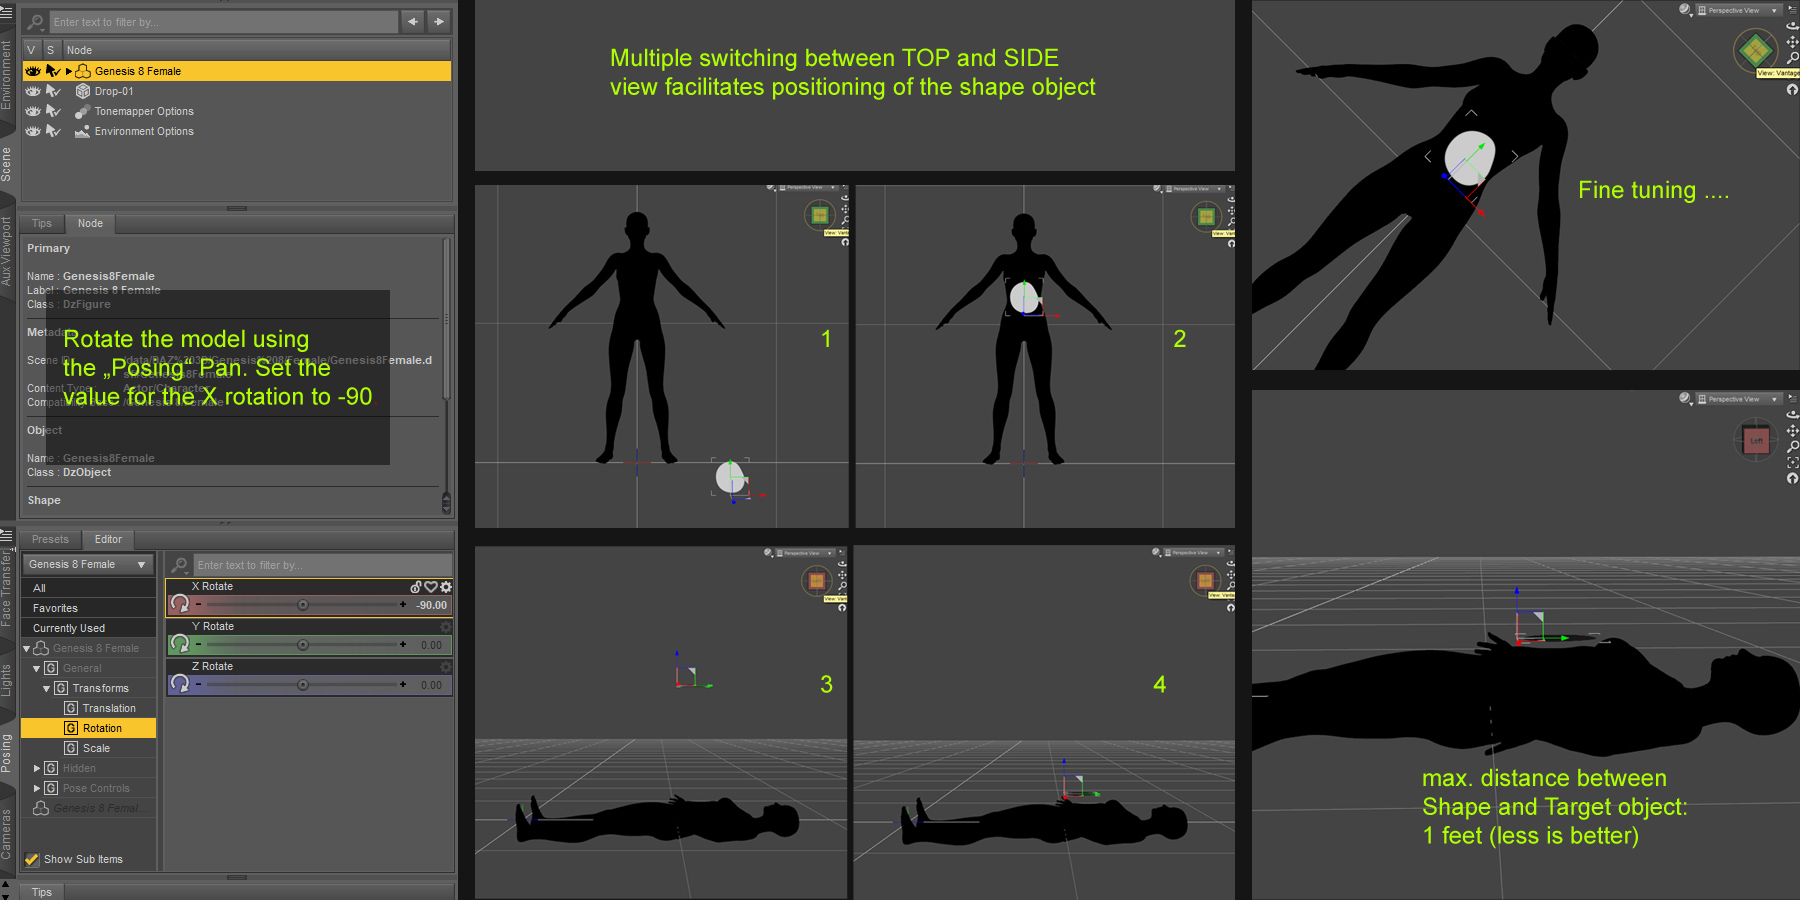
With your model selected in the "Scene" pane switch to the "Posing" pane. Set the "X Rotate" value (General ➔ Transforms ➔ Rotation) to "-90". You should always use the settings from the "Posing" pane and not the settings from the "Parameters" pane (even if they look the same and do the same). When you use the "Parameters", things will get weird later.Now it's time to position the selected shape object so that it can be dropped on the model's belly. This can sometimes be irritating if you've never positioned anything in 3D space before. But with the following simple trick, positioning is really easy.
a) Switch the Viewport's view to "Top view" and position the Shape object over the belly of the model.
b) Switch the view of the viewport to a side view (e.g. "Left View") and reduce the distance between the shape object and the model.
c) Switch back to the "Top view" and fine-tune the position of the shape object.
The distance between the Shape object and your model's belly should be no more than 1 feet (less is even better). OK - now for dropping.

Rotate the model instead of the shape object. Switch between top view and side view to position the shape.
4. Simulation
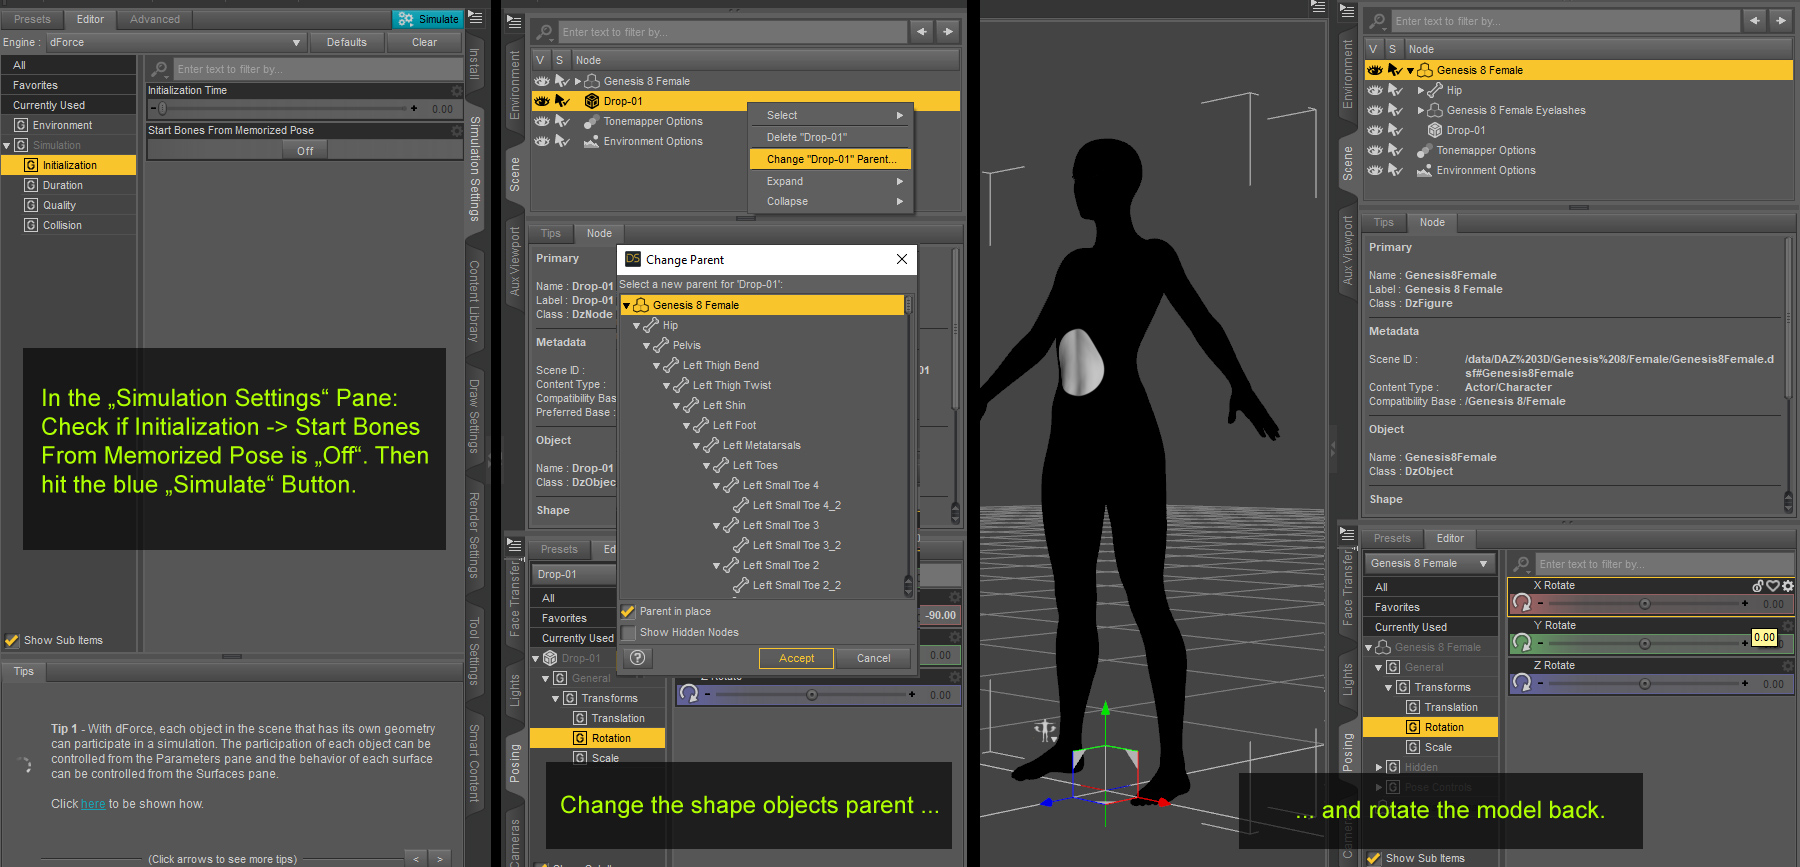
Switch to the "Simulation Settings" pane. Check if the "Initialization" ➔ "Start Bones From Memorized Pose" switch is set to "Off". Always use the "Off" setting - otherwise your model (and other objects) will change to their base poses and positions and you can watch a very whimsical "animation".Now click on the blue "Simulate" button. You will see how the shape object falls down step by step until the simulation is finished. You can reset the simulation by clicking the "Clear" button - but beware: this will reset every simulated object in your scene (including hidden ones).
Even though your work is ready and can be rendered (materials and morphs are explained below), I want to show you a simple trick that you will need often. Therefore, the model should not lie down, but stand upright.
To move the dropped shape object together with the model, it must be "parented" on the model. This is not as complicated as it sounds:
Select the shape object in the "Scene" pane and right-click to open a context menu. Choose "Change [shape] Parent ..." and select your model from the pop-up list (the model is usually located at the top of the list). Hit "Accept".
After you have selected your model in the "Scene" pane, you can rotate the model (and the parented shape object) using the settings from the "Posing" pane. Just set the "X Rotate" value (General ➔ Transforms ➔ Rotation) back to "0".
Keep in mind: after Simulation, the shape is fixed to the selected model pose. This means the shape will not follow when you change the pose of the model.

Check the Simulation Settings, than hit the 'Simulate' button. Change the shapes parent and rotate the model back.
5. Assign materials & morphs
Now it's time to set the viewport's display mode to "Nvidia Iray". If you have not yet switched the material of the shape object, you will see a white patch of wall paint. Not so inspiring ...You can change the material of the shape object in the usual way: Select it in the "Scene" pane and also in the "Surface" pane and double-click a material. Make sure that you use the appropriate materials! I.e. you cannot use the "A" shape with the "B" materials.
With the shape object selected in the "Scene" pane, you can also use the "Morph AFTER Simulation" morphs, located in the "Parameters" pane ➔ "Morph AFTER Simulation". With these morphs you can add volume to the selected shape object. Increase the value slightly - a setting of 25-30% is normally enough.
With the "Posing" settings you can rotate your model on Y-Axis. Observe how the combination of materials and morphs you added to the shape object catches and refracts the light.
A few tips for experimenting and playing around
After resetting the simulation, you can experiment with the deformation morphs ("Parameters" pane ➔ "Morph BEFORE Simulation") to change the shape of the object. You can also try to use a different material (after the simulation) or place the shape object in a different location. Playing with morphs, materials and positions is the best way to learn about the usage - but also the limitations - of the "Cum 4 All" project.Start with simpler scene setups (like the one described above) rather than trying to create a complex situation with multiple shape objects. Even I - as the creator of this package - had to deal with the objects, the limitations of the studio, etc. until I finally learned how to use "Cum 4 All" properly. My experiences are described in the "Known Issues" and "Getting Further" sections of the manual.
Don't despair if something goes wrong. In many cases, there's a logical reason for this. And if it's not logical, it's one of Studio's limitations or a known problem. Check the "Known Issues" section of the manual for an explanation and a possible solution. Remember the great Francis Picabia: "Our head is round so that thinking can change direction." - i.e. if something didn't work this way - try it that way.
Keep in mind: "Cum 4 All" does not consist of fixed specifications, but is designed to encourage you to experiment and discover new possibilities. You will find much more information, tips and hints in the manual
Good luck - and have fun!