"Briefs IX" - slipped and take off 3D clothes for GF9

Example from "Briefs IX" - take off / slipped / stripped 3D clothes for GF9
Whether you want to create regular undressing situations or maybe try some erotic renderings - "Briefs IX" offers you a wide range of possibilities.
In addition to easy-to-use pre-built 3D objects for creating scenes with pulled, shifted or slipped 3D clothing, you can simulate your own pose-based clothing positions with the included dForce objects.
"Briefs IX" contains:
- 5 easy to use Briefs in different positions
- 4 "only one leg" Briefs (thigh / shin, left / right) with a dForce modifier for lying poses.
- 2 special dForce objects to create your own pose-based slipped or take off Briefs positions
- 12 Surface Materials aka "Colors" (Iray only!) + 12 hidden material presets
- 6 Simulation Behavior presets for the dForce objects
- 9 QS3 (Quick Start Simulation Setup) to learn how to use the dForce objects
- 1 Light Setup Scene (Iray only!)
- some Simulation helper (scripts and one object)
How to reveal the hidden material presets
5 easy to use Briefs
4 "only one leg" Briefs
"Anchored" dForce vs. "Free" dForce
2 special dForce objects
Simulation Behavior Presets
The Simulation Helper
The QS3 - Quick Start Simulation Setups
Known issues (and possible solutions)
F.A.Q.
Simulation & dForce: some Tips
How to ...
Special agreement for 2D artists
Where's the package's content?
Installation
Briefs IX: EULA
Personal remarks
Credits
Curious about what comes next?
Click on the image to enlarge and zoom it in a separate TAB
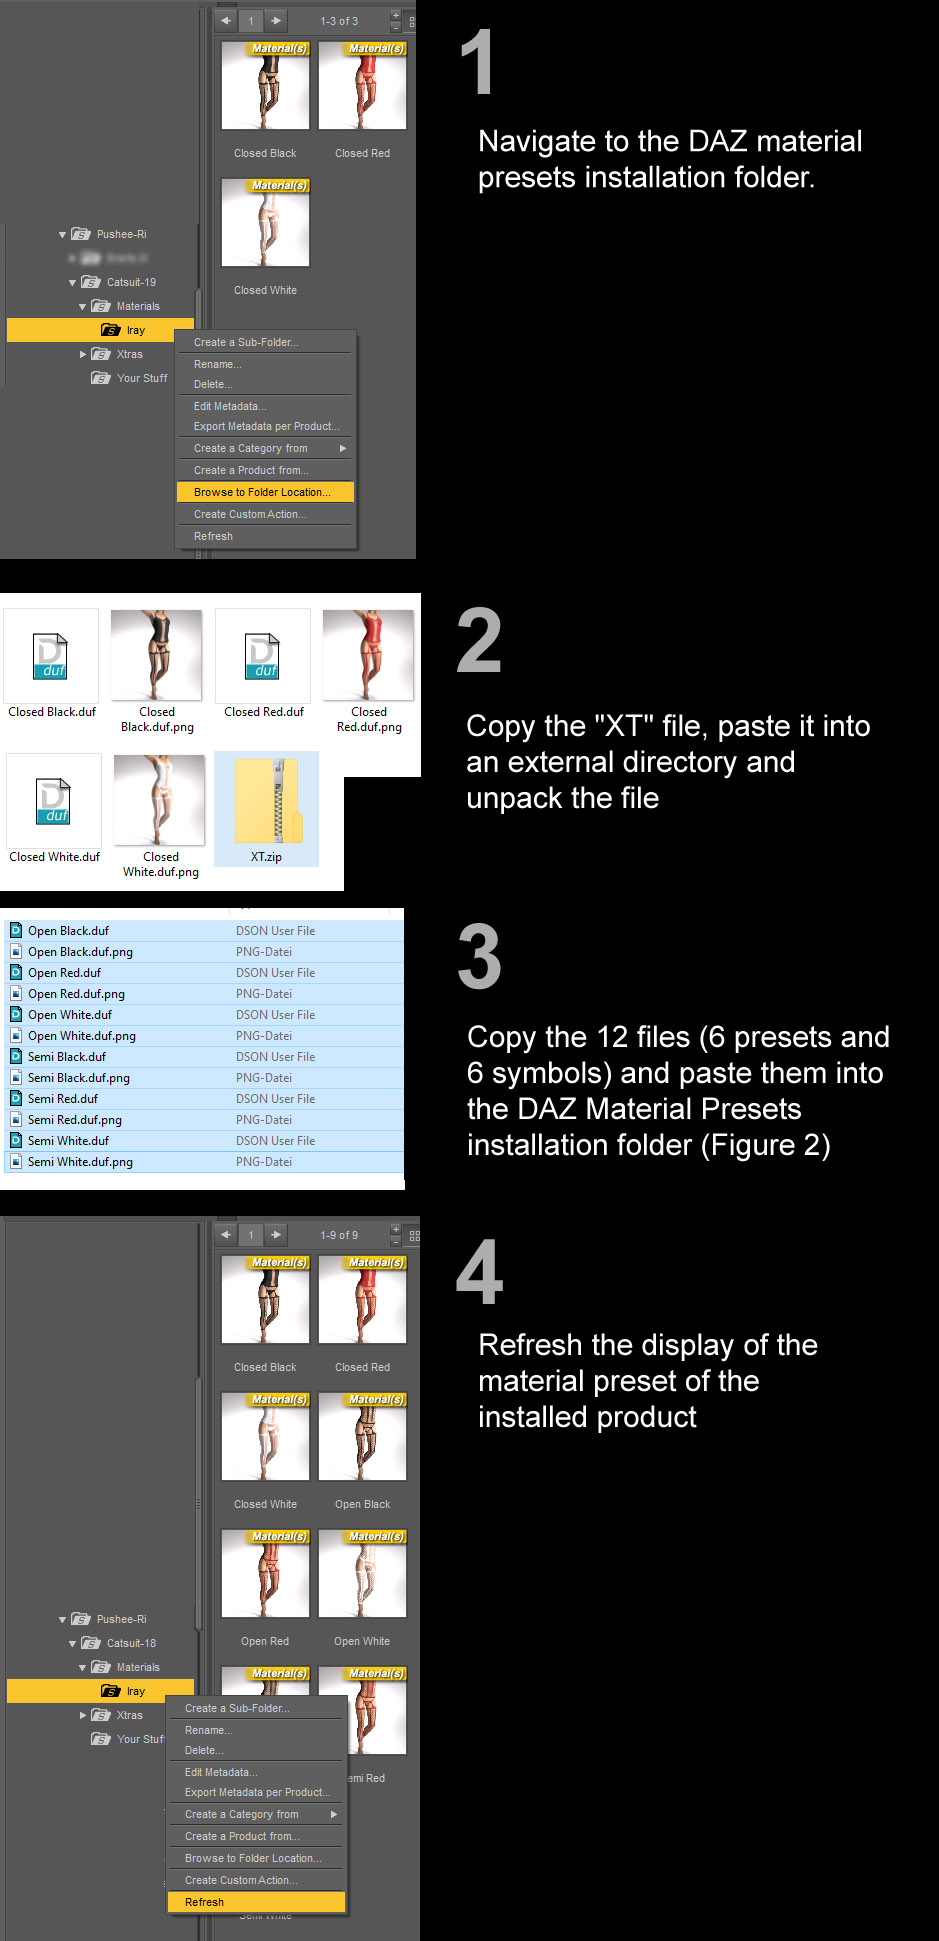
How to reveal the hidden material presets
As a PG version, several of the material presets are hidden. If you are sure that only you (or other adults) will use this project, you can make the hidden presets visible as follows.Please note: The screenshot on the left is from my project "Catsuit 1.9". But the steps are the same.
1 Go to the "Materials" -> "Iray" folder of the installed product. Right (!) click on the word "Iray" (below the word "Material") and select "Browse to Folder Location ..." from the pop-up menu.
2 You will see 7 files. One of them is named "XT" ("XT.zip" if file extensions are shown). Copy this file and paste it into a directory outside the DAZ program. For example, you can use the "Downloads" or "Documents" folder of your operating system.
Do not unpack the "XT" file inside the folder where you found it!
3 The unzipped file contains 12 files. Copy and paste these files into the folder where you found the "XT" file.
4 Back to the DAZ app., right (!) click on the word "Iray" (below the word "Material") and select "Refresh". The new material presets will be shown.
Click to enlarge in a new TAB
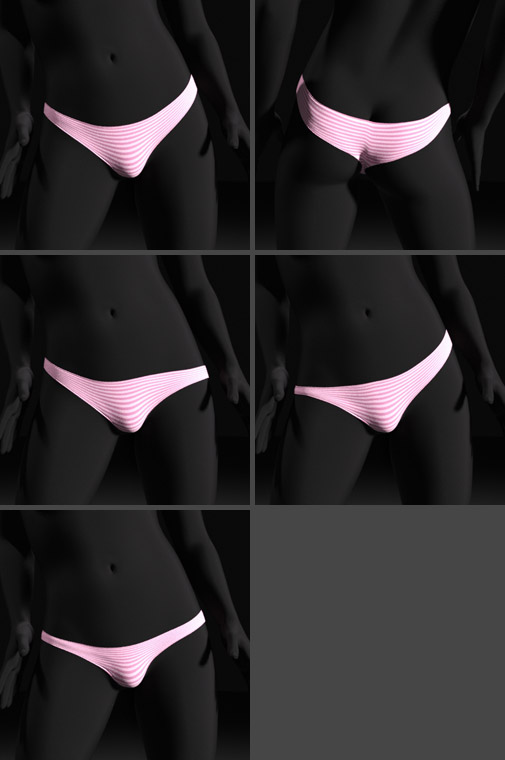
5 easy to use Briefs
These are normal objects (without dForce). Besides a regular positioned Brief you get 4 Briefs in slightly slipped positions.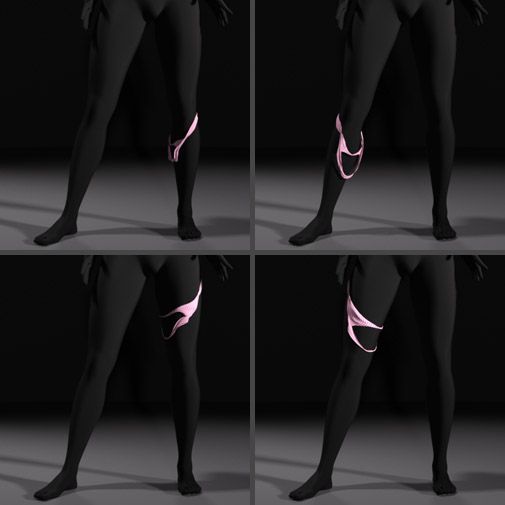
Click to enlarge in a new TAB
4 "only one leg" Briefs
In upright poses you can use these 4 briefs like normal clothes. In lying positions you can use dForce Simulation to get a more realistic look.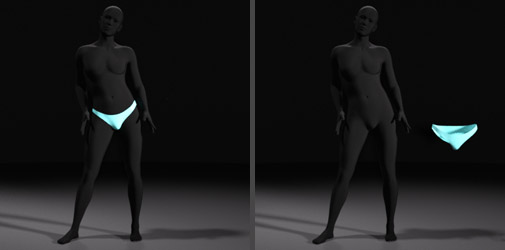
Click to enlarge in a new TAB
"Anchored" dForce vs. "Free" dForce
You've probably used dForce clothing before and may be wondering about the dForce objects in this project. Normal dForce clothing - which I refer to as "anchored" - usually has reference points on the model: a shirt rests on the shoulders, pants on the hips, etc.This is not the case with the dForce objects from this project. There are no "real" reference points, but the objects can - more or less - fall freely ... and this leads to unusual behavior and sometimes also to partially "torn" Briefs.
In this manual, you will learn how to deal with this behavior to still achieve good and convincing results.
Keep in mind: All dForce objects have a dull color without gloss and depth when loaded. This is how the Simulation Behavior Presets (see below) are displayed. Do not change this color!
2 special dForce objects
You can use these objects to simulate take off and than dropped or draped Briefs and, even better, to create your own pose-based positions with slipped clothes.XP Body
"XP" stands for "experimental" - but don't panic: that doesn't mean you're buying an untested, weird object! Rather, you can use this great object to create your own slipped clothing variations starting from the regular position of the Briefs. You may have to experiment a bit - but you'll see: it's really fun!
You can find more information in the QS3 section ("H" and "I") and in this short manual
XT Positionable
Even though this is the most difficult object to use in this package, it is worth using. Unlike the "XP Body", you can position this object exactly where you want ... and this gives you the possibility to simulate countless, extravagant positions of the Briefs.
When loaded, the object is located on the left side of the model below the hand.
More information and examples in the QS3 Section ("A" - "G").
Once again - keep in mind: These objects have a dull color without gloss and depth. This is how the Simulation Behavior Presets are displayed. Do not change this color before you start the simulation! Only when you are satisfied with the result of the simulation, you can switch to one of the normal materials.
Simulation Behavior Presets
DAZ controls the behavior of objects during a simulation in a special section of the "Surfaces" parameters pane (where usually the color and textures of an object are set).The included presets (dForce ➔ Sim Behavior) control the simulation behavior of the Briefs, but should not be considered universal. A preset that works in one position and orientation may produce completely different results in another situation.
I suggest you try out for yourself, which preset is best for you in a scene.
If you want to create your own presets, see the following article for information: Control of the simulation behavior ↗️
The Simulation Helper
You can use these scripts / objects (which you can find in the Xtras ➔ Simulation Helper folder) to make positioning and simulation easier.Selected-Hide / -Show
In some situations, the target of the falling fabric may be hidden by another part of the model's body. Take a look at scene "2" in the QS3 section.
Of course, you can try to bend/twist the body part to get an unobscured target area .... or you can simply hide the body part. This is done by using the "Selected-Hide" script.
Simply select the body part you want to hide in the "Scene" pane and double-click the "Selected-Hide" icon. The script hides not only the selected body part ("Node"), but also all its "Children" ("Child Nodes"). I.e. with a selected forearm, the script hides not only the forearm, but also the hand, fingers, etc.
When the simulation is complete, simply select the entire model in the "Scene" pane and double-click the "Selected-Show" icon. Hidden body parts will be displayed again.
the PIN object
The use of this object is described in scene "2" of the section QS3. In short, you can use this object to "glue" a dForce object to the model.
Keep in mind: When you use the "PIN" object, there will always be a side / view that does not look good. Therefore, always plan the later camera angle before using this object (see also "Tips and Hints").
The QS3 - Quick Start Simulation Setups
A QS3 is a combination of (A) a scene containing a positioned dForce object and (B) an additional, associated pose.To use it, load the scene first. Than load a G9 model. It is recommended to use the G9 base model initially. Other models (with different sizes) may cause problems, because the dForce object may intersect with the model or the distances are to big.
After the model is loaded, add the associated pose and simulate.

How to hang a take off Briefs on the foot of the model
QS3 "A"
This scene shows you how to hang the "XT Positionable" Briefs to something - in this case a foot. First load the scene. You will see gray Briefs floating in the air.
Two things to keep in mind:
1) Don't change the position of the Briefs.
2) Don't change the material of the Briefs. Only the pre-loaded material is finetuned for a good simulation result. All other materials are used with the
simulation default settings, which can lead to unexpected results.
Now load the G9 base model and add the pose "A 2".
Switch to the "Simulation Settings" pane (which is usually located on the left side of the screen). Check if "Initialization" ➔ "Start Bones From Memorized Pose" is set to "off" (even though this is the normal setting of all my scenes, it's a good idea to learn this at the beginning: when this setting is "on", the simulation time increases up to 5 times).
Locate the blue "Simulate" button in the "Simulation Settings" pane and click it to start the simulation. After the simulation is complete, you can change the material of the Briefs.
The steps described here also apply to the following QS3s.
The scene in detail
The "QS3" are not only to show you the simulation, but also to learn how to use the dForce objects. Therefore, I will try to describe the structure of the scenes.
No morphs are used in this scene. The dForce object is only rotated, scaled and positioned. Positioning in 3D space can sometimes be a bit confusing, but with the "top-side-top-side" trick I explain in my Positioning in 3D space ↗️ article, everything becomes easier.
After you have loaded and posed the model you can see, that the dForce object is not exactly (thight fitted) positioned on the models leg. But these gaps are fine! The simulation algorithm will do the rest.
These gaps also avoid intersections between the dForce object and the model. During the simulation process, intersections (even if they are really small) lead to disturbed / distorted dForce objects.
Going further: The third purpose of the "QS3" is to invite you to experiment. After you reset the simulated dForce object (via the "Clear" button below the "Simulate" button), you can try what happens when you change the position of the dForce object or observe the effects of the Simulation Behavior materials (dForce ➔ Sim Behavior).
You can also try draping the dForce object on the model by dropping it anywhere. Experimentation is the best way to learn the behavior of dForce objects.

How to create your own one-leg solutions with slipped 3D Briefs
QS3 "B"
This example demonstrates the use of the Simulation Helper and shows you how to create your own one-leg solutions.Follow the steps described above (load the scene, load the G9 model and add the pose).
If you now start the simulation, the Briefs simply slides down the leg. But this does not look like the picture on the left.
Take a closer look at the "Scene" pane. You will see an object named "Simulation Helper Pin" with a closed eye symbol (i.e. this object is hidden). Click the eye icon and the "Pin" will be visible. Now start the simulation again.
The scene in detail
As you have seen, hidden objects like the Pin are not detected by the simulation algorythm. This is helpful not only when you want to simulate two or more objects at once, but also in situations like the QS3 "B". When a dForce object intersects with another object (for example, the pin), the intersection area is "glued" at that point. This is helpfull when you want to keep parts of dForce objects in place while the rest slide down.
Please note: When you use PINs (or other intersections) to "glue" a dForce object, there will always be a weird/bad side. I.e., you will have to change the camera position to show only the good side in your final rendering.

How to create your own one-leg solutions with slipped 3D Briefs
QS3 "C"
This QS3 demonstrates the use of the Simulation Helper Scripts. The Pin object from QS3 "B" is also used, but it is immediately visible.Follow the steps described above (load the scene, load the G9 model and add the pose).
If you now start the simulation, you get a somewhat strange result that does not look like a one-legged solution. This happens because the Briefs intersect with the models left leg. Let's hide that leg!
Select the left thigh of the model in the viewport and double-click the Simulation Helper script Xtras ➔ Simulation Helper ➔ "Selected-Hide". Now the left thigh down to the toes is hidden. Perfect!
When you start the Simulation again, the result will correspond to the image on the left side as soon as you make the left leg visible again. To do this, select the complete G9 model and use the script "Selected-Show".

How to use the XT object to create a slipped clothes position
QS3 "D"
This scene demonstrates the use of the "XT Positionable" to create a new pose-based position. Load the scene, the G9 model and the pose and simulate.The scene in detail
The "XT Positionable" comes along with a bunch of morphs. These morphs can be used to roughly position the dForce object on the legs of the G9. As shown in the previous QS3, you don't have to be too precise with the positioning. The final "fit to" will be done during the simulation and according to the selected Simulation Behavior Preset.
Going further: this pose is ideal to change the Simulation Behavior Presets. This presets are located in the dForce ➔ Sim Behavior folder. Clear the Simulation, choose an other preset and simulate again. Look and compare what happens, when you use different presets.

How to use the XT object to create an other slipped clothes position
QS3 "E"
Just an other example of the "XT Positionable" used to create a new pose-based position. This time I had to use more morphs to get a good position. Follow the steps described above and start the simulation.Originally, this scene / pose was intended to show possible errors and problems. With an older version of the Briefs ( called "Knickers", more vertices, an other mesh topography, etc) I had lots of problems ... but this example worked right away. Nevertheless, some tips to avoid problems:
• The more morphs, the more simulation errors Try to use as few morphs as possible to position the dForce object. In some situations, an "over-morphed" and max. stretched object will not be simulated like expected. Instead, the simulation time increases and the result looks like a Briefs made of chewing gum.
• The more parallelism, the better Try to use poses with (more or less) parallel legs / thighs / shins. A pose like used in the QS3 "E" will lead to lots of morphs and stretchings ... and thus to the problems mentioned above.

How to use the XT object to create an other slipped clothes position
QS3 "F" & "G"
These QS3 scenes also demonstrate the use of the "XT Positionable". While "F" uses pins, "G" shows you the use of intersections to "glue" the Briefs to the model's hand.Using the information and experience from the previous scenes, you can now create your own "taking off clothes" scenes using the "XT Positionable" object.
Please also refer to the additional information in the "Tips and Tricks", "How to" and "Known issues" sections.

How to simulate slipped 3D Briefs using the XP Body object
QS3 "H"
This scene (and also the following) is not a "real" QS3, because it uses a rigged and parented object - the "XP Body". This object must be loaded with the G9 selected. Therefore, the use of this QS3 differs from the scenes above:1. Load the scene
2. Load the G9
3. Load the Pose
4. Load the "XP Body"
The XP Body object has many morphs. Without these morphs, the Briefs will not follow gravity in most cases. If you want, you can start a simulation: the Briefs will just slide down a little and behaves like a regular, "anchored" dForce garment.
With the "XP Body" selected, switch to the "Parameters" pane ➔ Morphs. There are many other morphes, but for your first experience with XP Body please scroll to "Widen Back". Change the value to 43.0: click on the "0.0%" value and enter "43.0". This is faster than trying to set the value with the slider. Now you can start the simulation.
The scene in detail
Unlike the "XT Poseable" object, the "XP Body" Briefs cannot be moved to other positions. I.e. each simulation starts from the same position as the regular Briefs. Without the use of at least one of the morphs, little happens during the simulation. It is only through the morphs that the Briefs are widened and can slide down the model.
This QS3 uses a higher value for the morph. For other poses you may use lower values - sometimes 8.0 to 12.0 will be enough. This depends on the pose and your intention of what the result of the simulation should look like ...
... and that is why I call this object "experimental" (XP): Before you start the simulation, you cannot know or even estimate what the result will be. Small changes in morph values can lead to large changes in simulation behavior. The simulation of the XP Body is not an exact science. Rather, it's about experimenting with different settings - and having fun with unexpected results.
Going further: You can use this scene for your own experiments. What happens when you increase or decrease the value of the morph. What happens if you use an other Simulation Behavior Preset or an other morph. Keep in mind: you can also use the simulation helper (Pin, Hide) to control what may should happen.

How to simulate slipped 3D Briefs using the XP Body object
QS3 "I"
The last example shows you how to use the pulling and bulging morphs in the best way. So don't be surprised about the pose after loading it: that's exactly how it's meant to be.It's always a little difficult to get an object under 3D clothing (like the hand under the Briefs in this example). And in upright positions the simulation algorithm often fails and you do not get the desired result.
Keep in mind: You get the best results when you work with the simulated gravity - not against it. I.e. the "free" dForce object should be as parallel to the ground as possible so that gravity can act from top to bottom.
A "simple" trick to get a hand under the Briefs: load the model and the XP Body. Now arrange the pose as desired. Partially you will have to pull / push the hand (or whatever) into the model - but that's OK!
Now change the desired morph - in this case "Pull Back Left" - until it covers the hand without overlapping. Be careful not to make the gap between the hand and the slip too large. You may need to change the position of the hand so that the Briefs and the morphed gap work well together.
Apply a "Shrink" behavior from the Simulation Behavior Presets and start the simulation.
When you are satisfied with the result of the simulation, you can rotate the model back to an upright position.
The following sections contain much more information - for example, how to reduce simulation artifacts or, in some cases, make them disappear altogether.
So - take some time to read: it's worth it!
Known Issues (and possible Solutions)
Hems not visible when Texture ShadedThat's right! To avoid problems and to achieve better simulation results, the hems are not generated by topography (3D), but by bump and displacement maps. I.e. the hems are only visible during / after rendering.
Possible solution:
Switch the display mode of the viewport to "NVIDIA Iray".
Unexpected simulation after changing the material
If you use the dForce objects with a different material than the attached and preloaded material, the simulation process may take longer or lead to unexpected results.
Possible solution:
Do not change the material of the dForce objects before you start the simulation. Always change the materials only after the simulation is finished.
The PIN doesn't "glue" a dForce object
In some situations, the PIN does not hold a dForce object in place - even if it looks that way at the beginning of the simulation.
Possible solution:
Scale the PIN in x, y or z direction (depending on the rotation) until you get a kind of "board".
Jagged parts of the Briefs after simulation
Often, some of the vertices (i.e. "points" in space that form the object) of the dForce object stick to the model during simulation. Unfortunately, this cannot be precisely controlled, but you can mitigate the "jagged" effect.
Possible solution:
When you are done and satisfied with your scene, select the Briefs object, switch to the "Parameters" pane and increase the Mesh Smoothing ➔ Smoothing Iterations. Change the value slightly (for example to 15), because high values (50 and more) leads to a delay when rebuilding the viewport.
Pose cannot be changed with simulated dForce object
That's true ... and that's why I call simulated dForce objects "pose-based".
Possible solution:
Before the simulation, decide which pose you want the model to assume.
In some poses, body parts are "consumed" by the fabric
This happens due to the "Mesh Smoothing". During the development of my projects I had to decide whether I wanted to create only one or two easy-to-handle garments with so-called "weight maps" - this is the normal and quick way that most products take - or whether I wanted to create many different garments with "auto-smoothers". I decided to go for the latter option.
Both - "Weight Maps" and many different objects - would have multiplied the working time (and thus also the price per project). But that would be neither in my interest nor - presumably - in yours.
Possible solutions:
• Change the camera view / rotate the model to hide the "consumed" part
• Change the pose / the position of the "consumed" body part
• With the garment selected in the "Scene" pane switch to the "Parameters" pane and set Parameters ➔ Mesh Smoothing ➔ Enable Smoothing to "Off"
F.A.Q.
Are there no 3Delight materials?Unfortunately not. I tried to create some, but I didn't manage to do it. Therefore, I decided to make a Special Agreement for this product.
Can I use "Briefs IX" even if I don't have an Nvidia graphics card?
Yes, you can. But be aware that rendering takes considerably more time. What takes only minutes with an Nvidia card, takes hours without it.
Can I use this product on a MAC?
Unfortunately, I don't have a MAC and don't know anyone who does. From what I've seen so far, there seem to be some general problems with the DAZ versions and the MAC OS. Therefore, I can unfortunately not recommend this product for MAC users.
What are all the bulging and pulling morphs for?
One example is shown in QS3 "I": you can use these morphs to put a hand (it doesn't have to be the model's one) under the Briefs, for example. Other morphs can be used by Futanari Artists to cover the model's genitals. Here is a short manual
Is there also a version for GF8?
Yes, there is also an adult oriented version called "theBriefs". Please visit my Articles ↗️ page and scroll down to the "Manuals" section for more information.
Simulation & dForce: some Tips
Unfortunately, there is no general "how to" when it comes to simulated 3D take off or slipped clothes. Each pose and garment position has its own challenge. Therefore, here is just a compilation of tips and hints to help you get started.- Let yourself surprise
The XP Body object may not be precisely controllable ... but that's exactly what makes it so appealing. Instead of fiddling with poses and positions: Just load your favorite pose and the "XP Body" Briefs,
use the morphs and be amazed by the simulated result. Keep in mind: you can do the Simulation either with "Start Bones From Memorized Pose" switched to "Off" or switched to "On"
(take a look at the QS3 "8").
- Rotate the model if it is beneficial for the simulation
Sometimes you may want the XP Briefs to stay in place and shrink just a little (like QS3 "I"). In this case you can rotate the model. Keep in mind: this will produce a "good side" and a "bad side" (see below).
- Act like a film director
When people fight in movies, no one really gets punched (except when Will Smith is in the movie). The impression of a brawl is only created by the
right camera position. Same goes for the set up of a scene.
As explained in the description of the simulation helper PIN, there is a "good side" and a "bad side" when using the PIN. Another "bad side" occurs when running a rotated simulation (see above).
In this cases (and maybe more), you need to "hide" the bad side by choosing a good camera position.
- Positioning in 3D space
This can sometimes be very fiddly - especially if intersections also have to be taken into account. The "top-side-top" view trick makes it a bit easier:
Positioning objects in 3D space ↗️
- Don't be too precise Look at the QS3 before the simulation. No dForce object is positioned tightly, instead there are gaps. The tighter fit after simulation is achieved by gravity and the Simulation Behavior Presets.
- Avoid unwanted intersections Intersections between the dForce object and the model cause distortions during the simulation. The intersecting vertices of the garment stick to their positions, while the "free" vertices
follow gravity. The result are visible, sometimes even large "jags" on the garment that really don't look good.
- Avoid large scaling If you scale or stretch a dForce object too large (for example, to position it between body parts that are far apart), even
the best simulation algorithm (and / or an ultra-spandex material) may not produce good results. Keep your scenes and poses simple.
- Avoid down-scaled dForce objects
You may want to reduce the height or depth of a dForce object. In this case, you may find that the simulation process takes longer and / or a splash screen appears.
This is triggered by the compressed vertices (i.e. the "points" in space building the 3D object) after scaling.
- Have fun I have to admit that sometimes fiddling with the positioning of dForce objets or fine-tuning the Simulation Behavior settings can be quite annoying. If this happens to you, take a deep breath,
have a nice cup of tea, and remember that the only reason to use my work is to have fun.
How to ...
I have added this section by request. It will be expanded by questions from users (if the questions cannot be clarified by the QS3, FAQ etc.).... Rotate a simulated dForce object together with the model
Unlike the XP Body, the XT objects do not follow the rotation or movement of the model. This is because they are not "parented" to the model. To "parent" this objects:• Switch to the "Scene" pane and locate the XT object
• Right click the object and select "Change [XT Object] Parent ..."
• Select your model (usually at the top of the list) and "Accept"
The XT object is now "parented" and will follow the rotation of the model.
... Use the PIN with "Start Bones From Memorized Pose" switched to "On"
Like an "XT" object above, you have to "parent" the PIN to the model (or a bodypart). To "parent" the PIN:• Switch to the "Scene" pane and locate the "SimHelp-Pin"
• Right click the object and select "Change 'SimHelp-Pin' Parent ..."
• Select your model (usually at the top of the list) or the part of the body in which the PIN is pricked and "Accept"
The PIN object is now "parented" and will follow the movement of the model.
... Control the simulation behavior
Although there are some presets, it may happen that none of them works for a specific scene. In this case you can try to create a new Simulation Behavior Preset. You can find my article here: Control of the simulation behavior ↗️Be sure to save your new preset - either as a component of the scene or as a new material preset (File ➔ Save as ... ➔ Material Preset).
... shift the crotch of the "XP Body" Briefs
To get a shifted crotch you have to simulate the XP Body Briefs. You may have to try several times to get the best morph values (suggested: "Crotch Shift Left / Right" and "Widen Briefs Xtreme") and the best Behavior Preset (suggested: "Shrink and Stay 02") ... but what you nearly always have to do is to rotate the model (except of lateral poses). In the most cases, you will get a good side / bad side - that's why you should keep the tip "Act like a movie director" in mind.Special agreement for 2D artists
3Delight ArtistsI really tried to get it to work with 3Delight materials, but I messed up every time I tried. There seems to be a big lack of experience (myself), because I've seen really good 3Delight renderings.
So if you are a 3Delight artist and want to create your own materials, feel free to share, distribute, or even sell them as long as you provide them as Add-On. This means: your own package must not contain any components such as objects, graphics, etc. from "Briefs IX" package.
Iray Artists
If you want to create more, better or different materials, feel free to share, distribute, or even sell them as long as you
a) leave the original materials untouched
b) provide them as Add-On. This means: your own package must not contain any components such as objects, graphics, etc. from "Briefs IX" package.
Where's the package's content?
If you have chosen to install the package via DIM (DAZ Installation Manager), you will find the package here:
My DAZ 3D Library ➔ People ➔ Genesis 9 ➔ Clothing ➔ Pushee-Ri ➔
Briefs IX : 5 Briefs in different positions
▶ dForce: 6 dForce Briefs (XP, XT and 4 "only one leg" Briefs)
➔ Sim Behavior: 6 Presets to control the Simulation Behavior
▶ Materials ➔ Iray: Materials for the Briefs (Iray only!)
Xtras
▶ Iray Lighting Scene: 1 light setup (Iray only!)
▶ QS3: 9 Quick Start Simulation Setups
▶ Simulation Helper: 2 scripts and one 3D object
Installation
After you have downloaded the files (a .zip file, some .txt files and maybe other files), I recommend that you make a backup copy of the files and save them in another folder or on a USB stick or something similar. I also recommend opening the download directory in a file explorer window, because later you will need to copy some files from this folder to another folder.
Installation can be done in two ways: using DIM - the "Daz Install Manager" - or manually.
")
Click on the image to enlarge and zoom it in a separate TAB
Installing with DIM
1 : Open the DIM application, find the gear icon in the upper right corner and click on it.2 : Select "Basic Settings ..." in the pop-up menu.
3 : The "Basic Settings" dialog box appears, where you can see several paths used by DIM. You will need the "Package Archive" as this is the folder where DIM temporarily stores the files to be installed. Click the path next to "Package Archive" to open the directory in a new File Explorer window.
4 : Now copy the .zip file from the download window and paste it into the DIM file explorer window ("Package Archive") you just opened. Use the "Copy and Paste" method instead of moving the files, because DIM "gobbles" files that are in the "Package Archive" folder.
Keep in mind: Do not unzip the .zip file, but copy the zip container as it is.
5 : Switch to the "Ready to Install" tab of the DIM. If the product you want to install is not displayed, click the "Refresh" icon (two curved arrows in the upper right corner).
6 : On the "Ready to Install" tab, select the product you want to install and click the "Start Queue" button in the lower left corner. The product will be installed and can be found here: My DAZ 3D Library ➔ People ➔ Genesis 9 ➔ Clothing ➔ Pushee-Ri ➔ Briefs IX (see above)

Click on the image to enlarge and zoom it in a separate TAB
Manual installation (PC)
1 : Unzip the .zip file and keep the File Explorer window open. Expand the "Content" folder with a double click.2 : Locate the "My DAZ 3D Library" folder and open it. The easiest way is to open the DAZ Studio application, select the "My DAZ 3D Library" entry, right-click on it and choose "Browse to Folder Location ..." from the context menu.
Tipp: If you want to install the package to the "My Library" folder instead of the "My DAZ 3D Library" folder, you can use the technique described above. Simply select the "My Library" entry and invoke the context menu.
3 : A new File Explorer window will open showing the contents of the "My DAZ 3D Library" directory. If you compare the .zip folder with the library folder, you will notice that some directories are the same ("data", "Runtime", "People"). These directories will be merged in step 4.
4 : Switch to the File Explorer window that displays the unzipped .zip file. Select and copy the "data", "Documentation", "People" and "Runtime" folder.
Now switch to the File Explorer window where your DAZ library is displayed and paste the folders you just copied.
Close the DAZ Studio application and start it again. The product can be found here: My DAZ 3D Library ➔ People ➔ Genesis 9 ➔ Clothing ➔ Pushee-Ri ➔ Briefs IX (see above)
Briefs IX: EULA
In case you missed it - here is the "Briefs IX" End User License Agreement (EULA).
"Briefs IX", Copyright (c) by Pushee-Ri 2023. All Rights reserved.
By purchasing the "Briefs IX" package by Pushee-Ri you agree to the following terms of use:
1) This Product is provided "as is" without waranty of any kind. The Product (incl. DIM/manual installation) has been
successfully tested on several PCs.
2) You are allowed to share, distribute or sell the following products created by using "Briefs IX":
Pictures, Illustrations, Graphic Novels, Videos and Games. If you would like to support my work, you can mention the product name and / or the author.
3) You are allowed to share, distribute or sell your self-created surface materials as long as you leave the
original materials untouched and provide your surface materials as Add-On. This means: Your own package MUST
NOT contain components such as objects, graphics, etc. from "Briefs IX" package (as listed in the "FILES" section of the readme.txt).
4) You are NOT ALLOWED to share, distribute or sell the "Briefs IX" package in whole or parts of it.
Pushee-Ri, March 2023
Personal remarks
The biggest problem with this project was giving Victoria 9 good facial expressions for the promos. At some point I gave up on it and switched to Risa 9.
Credits
Thanks to HID3D for "Risa 9" - you saved my day!
Curious about what comes next?
Usually there are about 2 to 3 weeks between the upload of my online manuals and the availability of the project in the stores. If you are curious, you can visit my landing page called "Articles ↗️". All my manuals are listed there ... and maybe you will find one for a project that is not yet published.